OVERALL INDEX -----> [ WILD THING PART1 ] [ WILD THING PART2 ] [ WILD THING PART3 ] [ WILD THING PART4 ]
Part 2 index ---> [FRAME] [STEERING]
It was clear from the start that the Wild Thing would be a recumbent. The recumbent position is more comfortable than the upright or hunched-over position of a touring or racing bicycle, and puts the body of the rider at an attitude where its frontal area, and thus its air resistance, is minimized. Two wheeled recumbents generally come in two subclasses: short wheelbase and long wheelbase. Given the rider's position, the rear wheel naturally goes just behind the seat, but the front wheel can either go ahead of the rider's spinning feet or behind them, under the knees. The long wheelbase version is very stable but heavier and more cumbersome than its shorter cousin. The shorter model is lighter and more maneuverable, but less stable at high speeds and sometimes apt to flip under severe braking. A compromise wheelbase puts the front wheel between the rider's spinning feet, and unless either the rear wheel can be used for steering or the legs can be made to steer with the front wheel an interference will occur upon cornering. Very few stable bicycles have been built with rear wheel steering, and the latter solution is reminiscent of a child's tricycle. Gary Hale's machine has the rider's hands and feet spinning cranks both parallel to the axle of the front wheel, which both steers and drives. In fact, the riders legs and arms must "steer" with the front wheel. A commercially available recumbent, the Lightning P-38, has a steering interference between the front wheel and the rider's feet that the manufacturer claims is no problem once the rider gets used to it. I decided to make the Wild thing long, resulting in a machine more suited to a long cruise on an open road than short hops in town. As an exercise machine, this is appropriate enough. {but has impacted how likely I am to choose it for a ride instead of one of my many other, more conventional and practical bikes}
Although the details of the drive and steering system designs were incomplete at the time of the frame construction it was necessary to have a rough idea of what they would look like and where they would go on the frame so that they could be accounted for. Since these systems comprise much of the rider's contact with the machine, their positions should be dictated by the position of the rider. To figure all this out I sat in a reclining position with a tape measure and started sketching frames. In this manner I found suitable positions for the crank axis, arm lever axis, and seat.
The drive system must collect power from the body and carry it to the rear wheel, and to do that efficiently requires that the frame structure that carries it to resist the interactive forces. In a standard bicycle the drive system consists only of the crank and the rear wheel, with a chain between them. Stiffening the frame structure between the crank and wheel makes the bike more responsive to a driving load on the pedals. On a standard bicycle this structure amounts to two tubes called the chain stays, each between fifteen and eighteen inches long. The Wild Thing's drive system must carry energy a much greater distance from the feet to the rear wheels, and from the arms as well. The resulting rigidity requirements figured heavily into the frame design. {Is this pun intended? I don't remember!}
The steering system I planned would involve mechanisms within the arm levers and within the main frame. the requirements on the frame were that a large diameter backbone tube meet the head tube, or steering axis, at a right angle. The reason for this will become apparent when the steering system is discussed in detail.
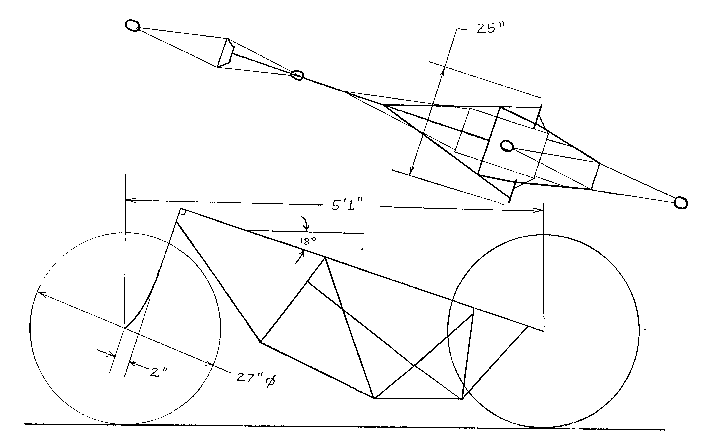
Keeping all the requirments in mind I set about designing the frame by drawin sketch after sketch, working towards a design that assured the appropriate and rigid locations of the various components The final result is a three dimensional space frame structure built of thirty-six separate pieces of tubing.
Although this seems elaborate it was within the constraints of my skill and equipment, and since many of the tubes are very small segments the overall weight of the bare (sans paint) frame is only around fifteen pounds. The complexity is largely due to the arm drive system. Each arm drive lever requires a bearing housing on the frame below and behind the seat, and a central power collection shaft requires similar bearing housings on either side of the lower central section of the frame. The three dimensional nature of the frame not only houses the drive mechanism tidily, but yields the torsionally rigid structure needed to resist the moments present at the crank and collection shaft.
The forward section of the frame is planar to clear the rider's legs and looks much like a standard bicycle. A 72 degree steering angle was chosen and since the backbone tube joins it at a right angle it slopes back at 18 degrees to join a horizontal planar structure that locates the arm lever bearing housings and the rear axle supports. The lower portion of the frame is basically a truss structure with the central collection shaft bearing housings held in place by two four legged spiders of slender tubes positioned to resist the driving forces carried through the chains and straps.
All the tubes were brazed together using nickel-silver rod with an oxyacetylene torch. My skills at brazing steel far exceed those for TIG welding aluminum, and so I chose to use 4130 seamless thin wall steel tubing. I already had a torch, tube vise, and other necessary bike-building tools in my own shop, so the basic skills and hardware I needed were already at my disposal. {I had no CAD at this time, so all designs were done on paper with a pencil, the old fashioned way. The only computers I had were HP calculators. I often wonder what it would look like had I been able to use Pro-Engineer or some similar solid modeling software.}
Since the tubing was only available in twenty foot lengths, I bought one length each. These included 1.25" DIA .055" wall (for the backbone, headtube, and bearing housings), 1.00" DIA .035" wall, and .625" DIA .035 wall for the remaining members. {I cut them in two at the tube vendor's site in Portland and drove home with them tied to the underside of my VW bug.}
Construction of the frame proceeded in stages. First I built the arm lever bearing housing substructures and the backbone-headtube structure. Both of these are planar, so all that was required to keep the tubes aligned while they were being brazed were slabs of plywood with nails driven into them. The next step was to join these substructures into a three dimensional structure in which the head tube was perpendicular to the arm drive bearing housings. This alignment was made with a level and a plumb-bob. The remaining tubes were added while this structure was pinned upside down onto a level work surface, alignments being made with levels, plumb-bobs, and steel rules. Since I planned to build only one Wild Thing, I avoided the use of elaborate fixturing, and relied on carefully cut tubes and accurate measurements to yield a geometrically correct result. The primary and most critical geometric requirement for any bicycle is that the two wheels and the steering axis be in the same plane, and since both wheels can be shifted about in their mounting brackets, this is also somewhat dependent on final assembly. Although the arm drive and collection shaft bearings support housings should all be parallel to one another and perpendicular to the plane of the wheels, the chains and straps that run between them are flexible enough to accommodate some misalignment.
The critical design problem in an arm driven bicycle is that of steering. If the arms are used for drive, how can they be used for steering also? A rider must be able to steer and apply power simultaneously, yet also be able to power without steering, and steer without powering. The two functions should not be coupled in any way.
For the solution to this problem I sat around in my reclining chair and studied my arms. I found that the most powerful motion in a line roughly parallel to my spine. As a mechanic, this is the how I apply force to a wrench to free a stubborn bolt. The orientation of my hand has little effect on this motion, however. If I have my fingers wrapped around a wrench I can twist or rotate that wrench on an axis parallel to my forearm without affecting the push-pull motion of my arm. So I chose to use the push-pull motion of my arm towards power and the twisting of my wrist towards steering.
The steering linkage is the most complex of the Wild Thing's mechanical systems. Converting the hand twisting motion to a steering motion at the front wheel while maintaining the de-coupling requirement requires a much more elaborate mechanism than that of a standard bicycle, which is steered directly. The design is illustrated in Figure 2 below.
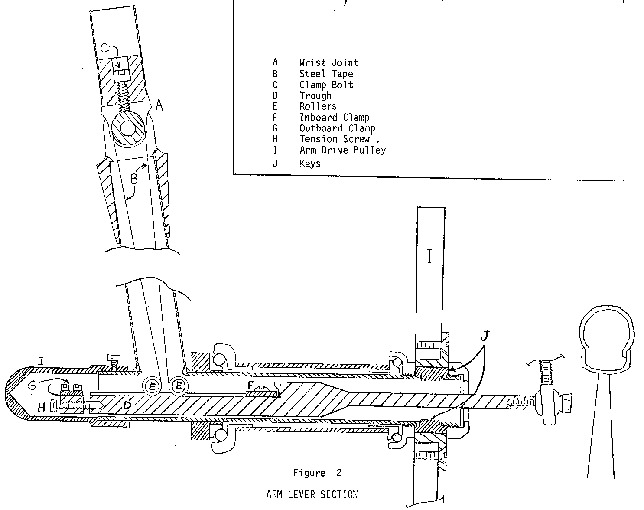
This drawing shows an arm drive lever in a cutaway view. As the wrist joint A (Figure P5) is rotated by the rider's hand, the steel tape B, which is clamped to the rotating part by clamp screw C, causes trough D to translate along the rotational axis of the arm. Rollers E, consisting of Torrington B44 roller bearings riding on .25" diameter dowel pins pressed into the housing, allow the tape to make the corner at the "elbow" and locate the trough. The ends of the tape are clamped at F and G. Clamp G can be adjusted with screw H, allowing the slack to be taken up during assembly.
The result is a mechanism that converts a rotary motion at the wrist to a linear motion of the trough. Since this trough piece lies along the rotational (drive) axis of the arm drive lever, the axial position of the trough is independent of the rotational position of the drive lever, and depends only on the rotational position of the wrist joint. This is where the decoupling of the steering and powering action occurs.
The location of the arm drive lever rotational axis was determined by the most natural motion of my arms and the location of the seat. Since I wanted to keep the already long wheelbase as short as possible, it became necessary to put the arm drive axes on either side of the rear wheel, as shown in Figure 3 below.
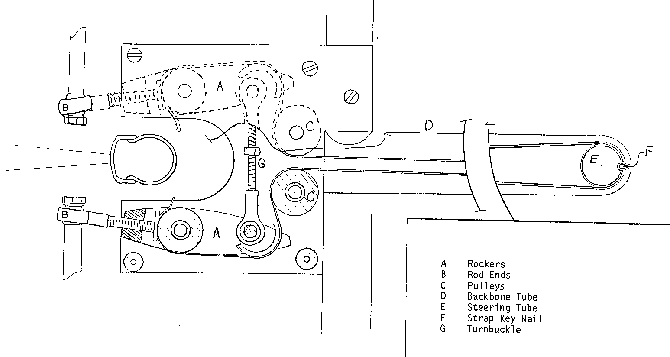
This figure shows the four-bar mechanism used to straddle the rear wheel and convert the linear motion of the troughs back into a rotary motion that could be used to turn the front fork.
As the troughs move from side to side, a plastic strap clamped to rockers A by rod end B is caused to move around rollers C and travel through the backbone tube of the frame D to wrap around the steering tube E. This loop of plastic strap twists through one half turn along the length of the backbone tube so that moving the wrist joints to the right results in a steering motion to the right (not shown in the figure).
The strap is keyed to the steering tube by a nail, and it's tension can be adjusted by turnbuckle G. Since the balls in rod ends B can spin freely, the rotation of the troughs has no effect on the steering. The plastic strap is standard half-inch packing strap with a tensile strength of 300 pounds. Its stretchy nature protects the rest of the steering system from shock, due to either accident or abuse. {I later found 600 pound test strap. There is no way to break the stuff, and it was less than a penny a foot!}
The overall result is a steering mechanism that allows the rider to turn the front wheel by twisting his or her hands. The mechanism is mostly enclosed, protecting it from contamination and damage and also lending an air or mystery to the design.
The weakest link in the system is the strength of the tapes in the arm drive levers. Each consists of two layers of .005" x .250" Mylar coated steel robbed from a Stanley tape measure. Assuming this material has a yield strength of 120,000psi, (based on medium grade spring steel), the two tapes would break under a load of 300 pounds. Since the radius of the wheel to which the tape is clamped in the wrist hoint is .375', this translates to a torque at the wrist joints of about ten foot-pounds. When riding the Wild Thing the rider grips the wrist joints in the palms of his/her hands and steers withthe thumb and forefinger only, making 10 ft-lbs a pretty difficult feat. Furthermore very little torque is required at the wrist joints to maneuver the Wild Thing once it is in motion. If one tape fails, the Wild Thing can still be steered by the other hand. {Over the years, the the tapes have failed only when someone attempted to steer it while it was stationary, with their weight on the bike and their whole hand on the joint. I learned to loosten the clamp screws (C, in Figure 2) when I had it on display}
END OF PART 2
OVERALL INDEX ----> [ WILD THING PART1 ] [ WILD THING PART2 ] [ WILD THING PART3 ] [ WILD THING PART4 ]